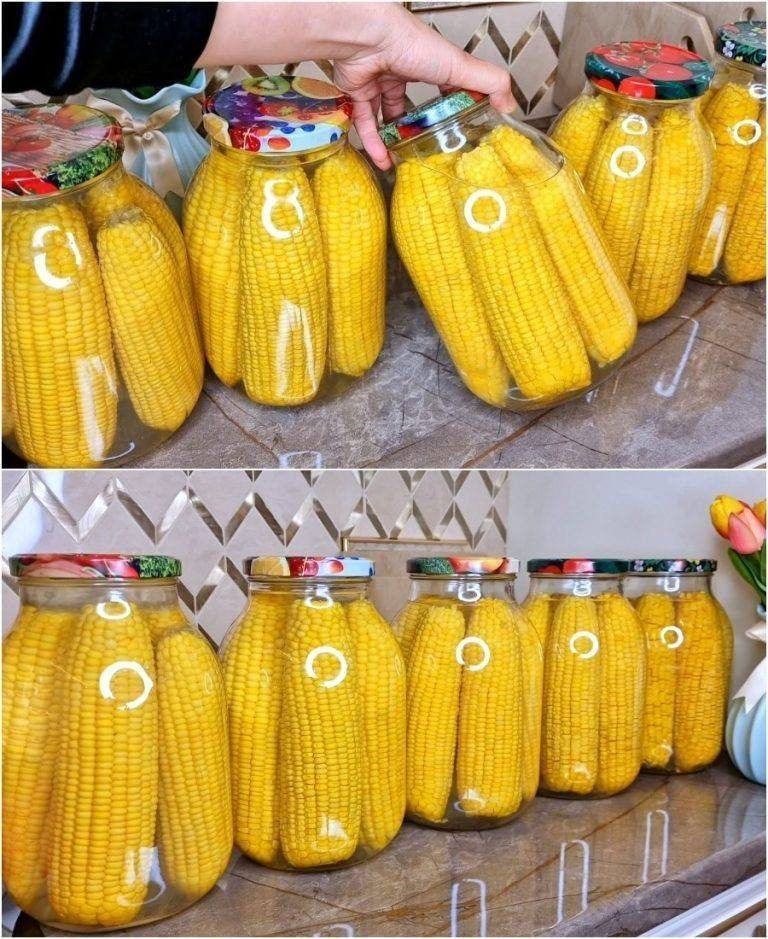
I’m sharing our simple, time-tested recipe for canning corn—perfectly preserved so you can enjoy the taste of summer even in the coldest months.
What You’ll Need:
-
Fresh corn on the cob
-
Clean, sterilized 3-liter jars and matching lids
-
Salt – 1 tsp per jar
-
Sugar – 1 tsp per jar
-
Boiling water
-
A large pot for sterilization
-
A kitchen towel
Step-by-Step Instructions:
-
Prepare the Jars and Lids
Wash the jars thoroughly and sterilize them, along with the lids. You can do this by boiling them or heating them in the oven.
-
Prep the Corn
Remove the husks and silks from the corn cobs, then rinse the cobs well.
Trim the ends (or “tails”) of the cobs. -
Fill the Jars
Place the corn cobs vertically into the jars to fit as many as possible.
Add 1 tsp salt and 1 tsp sugar to each jar. -
Add Boiling Water
Carefully pour boiling water into each jar, covering the corn completely.
Cover the jars loosely with sterilized lids. -
Sterilize the Jars
Line the bottom of a large pot with a towel to prevent the jars from cracking.
Place the jars inside the pot, then fill it with hot water until the jars are submerged up to their shoulders.
Once the water reaches a boil, sterilize the jars for 30 minutes. -
Seal and Store
After sterilizing, tightly screw or roll up the lids. Let the jars cool completely.
Store the canned corn in a cool, dark place—we keep ours in the basement.
Properly canned, it stays fresh for up to 2 years!
Extra Tips:
-
You can also use smaller jars—just cut each cob in half before placing it inside.
-
This corn is perfect for salads, stews, or just snacking right out of the jar.
If you enjoy recipes like this, give it a like or share—it really means a lot to me!


Leave a Comment